Using the Play framework with Eclipse [Part-1-Basic]
This article is written based on the play framework 2.2.4 version.
/ 이클립스를 이용한 플레이 프레임워크 사용하기 [Part-1-Basic]
이 글은 Play framework 2.2.4 기준으로 작성 되었습니다.
제목에 맞는 내용을 최대한 간결하게 전달하기 위해서 이 글에서는 Play framework에 대한 소개를 자세히 다루지 않습니다.
최소한의 설명을 덧붙이자면 제가 느끼는 큰 장점은 3가지입니다.
1.Full Stack framework 이다.
2.자바 소스코드 수정시 서버 재시작이 불필요하다.
3.JVM위에서 돈다.
또한 반대로 제가 느끼는 치명적인 단점은 2가지 입니다.
1.Play2는 Play1과 호환되지 않는다. (마이그레이션 작업이 아닌 전면 재개발 해야한다.)
2.현재 널리 쓰이는 Spring Framwork 는 Play에서 지원하는 기능 대부분을 포함하며 그 이상을 지원한다. (이로 인해 Play사용자가 상대적으로 적으며, QnA가 상대적으로 적다)
Concisely as possible in order to deliver the content for the title of this article does not discuss in detail the introduction of the Play framework.
Incidentally minimal explanation that I feel are three big advantages.
The 1.Full Stack framework.
2. Restart the server is not necessary when the Java source code modifications.
3.JVM turns on.
In contrast are the two fatal disadvantage is also that I feel.
1.Play2 is not compatible with Play1. (Must be front redevelopment rather than migration.)
2. Spring Framwork currently widely used includes most of the features supported by the Play and supports more. (This Play users have had relatively small, QnA is relatively small)
이러한 단점들에도 불구하고 agile 개발에 매우 적합하다고 생각합니다.
그럼 시작하겠습니다.
시작하기전에 전제조건은 2가지입니다.
1.Java 설치
2.eclipse 설치
Despite these shortcomings, I think it is very suitable for agile development.
Then I'll begin.
The prerequisites are two kinds before you begin.1.Installation Java
2.Installation eclipse
Java : http://www.oracle.com/technetwork/java/javase/downloads/index.html?ssSourceSiteId=ocomen
Eclipse : https://www.eclipse.org/downloads/
Play! 공식 홈페이지로 이동합니다 : https://playframework.com/
Play! Go to the official website: https://playframework.com/

1-1
전 2.2.4버전을 사용할거에요.
I'm using a pre-2.2.4 version.

1-2
다운로드 받은 파일을 원하는 경로에 압축을 푼 후 path를 잡아주세요.
Windows path는 다루지 않습니다.
Unzip the downloaded file to the desired path and then Catch the path.
Windows path is not covered.
1-3

1-4
터미널에 play 라고 입력하면 다음과 같은 창을 볼수 있어요.
When you type in the terminal's play see the following window.

1-5
프로젝트를 하나 생성해 보겠습니다.
Let's create a project.
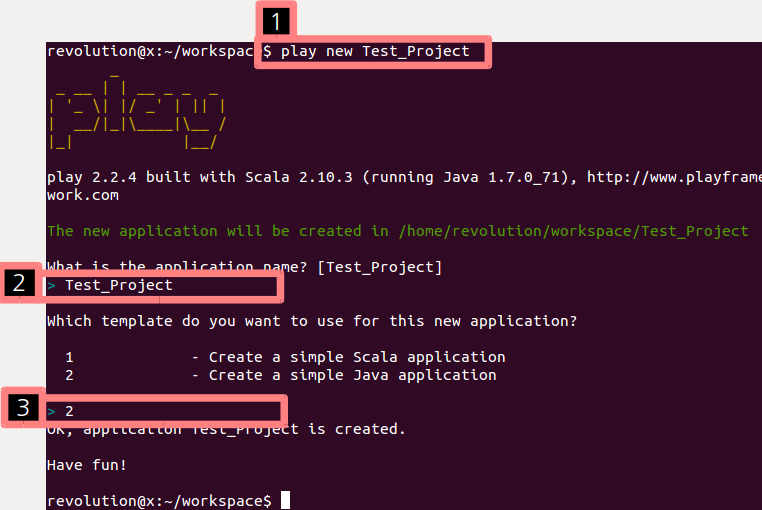
1-6
1.play new [Project name]
2.App name 입력. Project name과 같아도 무방
3.개발 언어 입력. (Java / Scala 선택가능)
1.play new [Project name]
2.App name entered. Mubang same as the Project name
3. The development of language input. (Java / Scala optional)
Eclipse로 import 하기위해 생성된 프로젝트 경로 안에서 다음과 같은 명령어 입력
$play elclipse
Enter the following command to import the generated path in the project into Eclipse
$play elclipse


project import후 perspective Java로 변경
After the change in perspective Java project import

project 경로 아래에서 play run 입력
play run under the project path input

브라우저로 localhost:9000 접속 (Play! default Port :9000)
Browser to localhost: 9000 connection (Play! default Port: 9000)

간결한 설명이었길 바래요.
I hope concise explanation though.
Part-1-Basic은 이것으로 마무리하고 Part-2-Advance에서 실제로 Play를 활용해 보겠습니다.
Part-1-Basic is finished with it, and let's actually take advantage of the Play in Part-2-Advance.
댓글 없음:
댓글 쓰기