Use the JMeter with Plug-in [Part-1 Basic]
/ JMeter와 Plug-in 사용 [Part-1 Basic]
Waring : With the help of Google translator for English speaking developers offer. Please give consideration to non-smooth representation.
English is blue.
JMeter는 apache에서 진행하는 프로젝트중 하나로 공식 홈페이지는 아래와 같습니다.
JMeter is one of the projects to proceed on apache websites are listed below.
http://jmeter.apache.org/
이 글에서 사용하는 JMeter는 2.11 버전으로써 Java 6 이상의 버전이 설치 되어 있어야 합니다. 다운로드 받은 파일을 압축을 풀면 {JMeter_Home}/bin 안에 실행 파일이 있으며
리눅스의 경우 jmeter.sh / 윈도우의 경우 jmeter.bat 을 실행하시면 됩니다.
JMeter is used in this article, you must have the Java 6 or later version by version 2.11. After unzipping the downloaded file {JMeter_Home} / bin is executable and in For the case of Linux jmeter.sh / window, execute the jmeter.bat.
JMeter is used in this article, you must have the Java 6 or later version by version 2.11. After unzipping the downloaded file {JMeter_Home} / bin is executable and in For the case of Linux jmeter.sh / window, execute the jmeter.bat.
*{JMeter_Home}은 당신이 압축을 푼 경로를 의미합니다.
*{JMeter_Home} denotes the path you extracted.
*{JMeter_Home} denotes the path you extracted.
JMeter 자체도 훌륭하지만, java진영의 매력은 3rd party lib가 아닐까요?
아래 사이트에서 JMeterPlugins-Standard-1.2.0.zip, 을 다운로드 받습니다.
JMeter itself is great, but I think the charm of the java area 3rd party lib?
Under the site JMeterPlugins-Standard-1.2.0.zip, the subject downloads.
JMeter itself is great, but I think the charm of the java area 3rd party lib?
Under the site JMeterPlugins-Standard-1.2.0.zip, the subject downloads.
http://jmeter-plugins.org/downloads/all/
다운로드 받은 파일의 압축 해제후 안에 있는 jar 파일들을 {JMeter_Home}/lib/ext 안에 복사한후 JMeter를 재시작합니다.
Copy the jar file in the downloaded file after decompression in {JMeter_Home} / lib / ext and then restart the JMeter.
Copy the jar file in the downloaded file after decompression in {JMeter_Home} / lib / ext and then restart the JMeter.
첫 화면은 다음과 같습니다.
The first screen is as follows.
The first screen is as follows.
그림 1-1
JMeter를 활용하는 방법은 크게 2가지가 있습니다.
1.Recoding 기능을 활용하여 사용자의 모션을 그대로 재현 하는 방법.
2.스크립트(테스트 내용)을 작성하여 테스트 하는 방법.
물론 두가지 다 궁극적인 목표는 부하 테스트 일것입니다.
쉬운 예제를 통해 이해하기 쉽도록 Simple한 Recoding용 Test Plan을 만들어 보도록 하겠습니다.
How to take advantage of JMeter are largely two ways.
1.Recoding reproduce the user's motion.
2. How to write test scripts (test details).
Of course, the ultimate goal is two kinds of load(stress) testing ilgeot.
Through an easy-to-understand examples to make it easier, let's make one Simple Test Plan for Recoding.
Test Plan 우측 마우스를 클릭하면 Add 가 나오고
다양한 기능들을 작성할수 있습니다.
가장 기본적인 Thread인 Thread Group을 추가하고
Thread Group 하위에 Logic Controller -> Recoding Controller 를 추가합니다.
이후 아래 두가지를 더 추가해줍니다.
Test Plan -> Add -> Listener -> View Result Tree
Test Plan -> Add -> Config Element -> Http Cookie Manager
완성된 화면은 아래와 같습니다.
Clicking the Test Plan Add a right-out
You can create a variety of functions.
Add a Thread Group, and the most fundamental Thread
Thread Group subordinate to Logic Controller -> Add the Recoding Controller.
Lets add more later down the two.
Test Plan -> Add -> Listener -> View Result Tree
Test Plan -> Add -> Config Element -> Http Cookie Manager
The completed screen is shown below.
모두 추가하셨으면
WorkBench -> add-> Non-Test Elements -> HTTP(s) Test Script Recoder 를 추가합니다.
When you've added all
WorkBench -> add-> Non-Test Elements -> HTTP (s) to add the Test Script Recoder.
HTTP(S) Test Script Recoder의 Port를 자신이 원하는 것으로 설정합니다.
저는 9000으로 하겠습니다.
HTTP (S) Port sets as they want in the Test Script Recoder.
I'm going into 9000.
Recoding의 원리는 Proxy서버를 이용하는 것 입니다.
Start버튼을 누르기전에 브라우저의 Proxy설정을 해주어야 합니다.
Windows 운영체제를 사용하는 경우 Chrome 브라우저와 Internet Explorer를 사용하는게 간편합니다.
Recoding is the principle of using a Proxy server.
The haejueoya your browser's Proxy settings before pressing the Start button.
If you are using a Windows operating system using easy haneunge Chrome browser and Internet Explorer.
-설정 -> 프록시 설정 변경
Internet Explorer 의 경우
-설정 -> 인터넷 옵션
For Chrome
- Settings -> Change proxy settings
For Internet Explorer
- Settings -> Internet Options
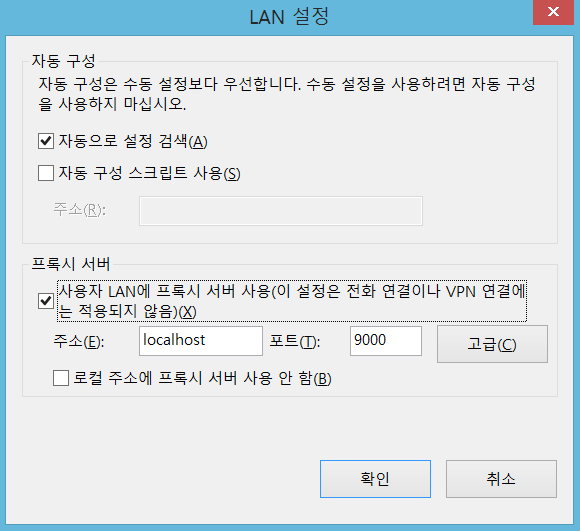
LAN 설정 클릭.
Click LAN Settings.
쉬운 예제를 통해 이해하기 쉽도록 Simple한 Recoding용 Test Plan을 만들어 보도록 하겠습니다.
How to take advantage of JMeter are largely two ways.
1.Recoding reproduce the user's motion.
2. How to write test scripts (test details).
Of course, the ultimate goal is two kinds of load(stress) testing ilgeot.
Through an easy-to-understand examples to make it easier, let's make one Simple Test Plan for Recoding.
그림 1-2
Test Plan 우측 마우스를 클릭하면 Add 가 나오고
다양한 기능들을 작성할수 있습니다.
가장 기본적인 Thread인 Thread Group을 추가하고
Thread Group 하위에 Logic Controller -> Recoding Controller 를 추가합니다.
이후 아래 두가지를 더 추가해줍니다.
Test Plan -> Add -> Listener -> View Result Tree
Test Plan -> Add -> Config Element -> Http Cookie Manager
완성된 화면은 아래와 같습니다.
Clicking the Test Plan Add a right-out
You can create a variety of functions.
Add a Thread Group, and the most fundamental Thread
Thread Group subordinate to Logic Controller -> Add the Recoding Controller.
Lets add more later down the two.
Test Plan -> Add -> Listener -> View Result Tree
Test Plan -> Add -> Config Element -> Http Cookie Manager
The completed screen is shown below.
그림 1-3
모두 추가하셨으면
WorkBench -> add-> Non-Test Elements -> HTTP(s) Test Script Recoder 를 추가합니다.
When you've added all
WorkBench -> add-> Non-Test Elements -> HTTP (s) to add the Test Script Recoder.
그림 1-4
HTTP(S) Test Script Recoder의 Port를 자신이 원하는 것으로 설정합니다.
저는 9000으로 하겠습니다.
HTTP (S) Port sets as they want in the Test Script Recoder.
I'm going into 9000.
Recoding의 원리는 Proxy서버를 이용하는 것 입니다.
Start버튼을 누르기전에 브라우저의 Proxy설정을 해주어야 합니다.
Proxy setting - Windows OS
Windows 운영체제를 사용하는 경우 Chrome 브라우저와 Internet Explorer를 사용하는게 간편합니다.
Recoding is the principle of using a Proxy server.
The haejueoya your browser's Proxy settings before pressing the Start button.
If you are using a Windows operating system using easy haneunge Chrome browser and Internet Explorer.
그림 1-6
Chrome 의 경우-설정 -> 프록시 설정 변경
Internet Explorer 의 경우
-설정 -> 인터넷 옵션
For Chrome
- Settings -> Change proxy settings
For Internet Explorer
- Settings -> Internet Options
그림 1-7
LAN 설정 클릭.
Click LAN Settings.
그림 1-8
프록시 서버 체크 후 JMeter에 입력한 포트 입력(저는 9000 포트를 사용합니다.)
Enter the proxy server port, then enter check-in JMeter (i user 9000 port)
Proxy setting - Linux OS
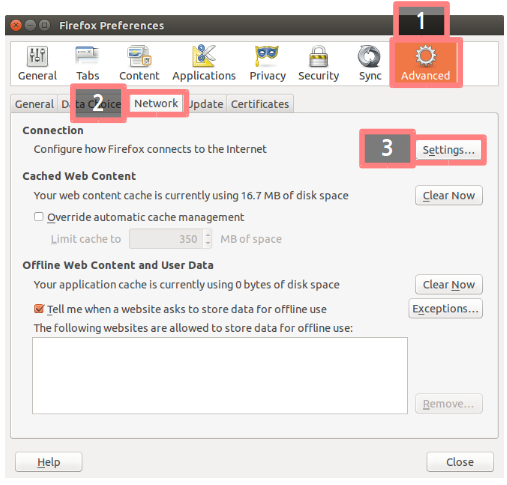
Linux OS를 사용하는경우 Firefox브라우저를 이용하거나 /ext/profile을 수정하거나
커맨드창으로 통해서 임시적인 proxy설정을 할 수 있습니다.
1.User the Firefox
-----------------------------------------------------------------------------------------------------------
2.Use the Command Line
set proxy
unset proxy
| export http_proxy=http://127.0.0.1:portexport https_proxy=http://127.0.0.1:portunset http_proxyunset https_proxy |
-----------------------------------------------------------------------------------------------------------
-----------------------------------------------------------------------------------------------------------
3.setting Profile
$sudo vi /etc/profile
-----------------------------------------------------------------------------------------------------------
설정을 완료한 후에 start를 누르고 아무 사이트나 방문해 보시면
주고 받은 모든 데이터가 Recoding 컨트롤러에 저장 되어있음을 알수 있습니다.
After completing the settings, press the start you see or visit any site
You know who to give all the data that is stored in the Recoding controller.
그림 1-9
Recoding Controller 하위에 제가 했던 action을 포함한 브라우저로 주고받은 모든 데이터가 기록되어 있으며 우측에 Parameter까지 상세하고 나오는것을 알수 있습니다.
All data sent and received by the sub-Recoding Controller browsers, including an action I did, and you know that the details are recorded and shown on the right side to Parameter.
그림 1-10
1번 버튼을 누를경우 Recoding Controller에 있는 Action들을 실행합니다.
2번 버튼을 누를경우 테스트 결과를 삭제합니다.
테스트 결과는 처음에 추가했던 View Results Tree에서 볼수 있습니다.
If you press the 1 button to execute the Action in the Recoding Controller.
If you press the button twice to delete the test results.
Test results can be viewed in the View Results Tree was added to the first.
단순한 테스트 결과에 실망하지 마세요.
당신이 JMeter에 친숙하게 다가가기 위해 Non-Graphical 한가장 간단한 예제를 작성한 것 뿐입니다.
Do not be disappointed with the results of a simple test.
Only you will create a Non-Graphical most familiar simple example to go off at JMeter.
다음장에서 Plug-in을 활용한 테스트를 보도록 하겠습니다.
Let the test using the Plug-in in the next chapter.
ps.저장 버튼을 누르면 '.jmx' 확장자 파일로 Test Plan이 저장됩니다.
잊지마세요. 자주 저장하고, 자주 백업해 놓으세요.
ps. If you press the Save button to save this Test Plan to '.jmx' file extension.
Do not forget. Save often, and frequently, place it back.


댓글 없음:
댓글 쓰기